
How to catch tuna from a kayak
9:41PM 4th Sep 13
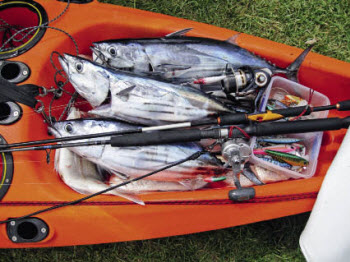
There’s something addictive about the scream erupting from light-tackle reels on that first hit and run, followed by the tough battle to land these speedsters, which often includes random dashes all over the ocean as they try to rip free of your lures.
Then, as the battle progresses further, the rapid dashes turn into heart-stopping circuits through the water column, first teasing you by sliding towards the kayak, then dashing your hopes with a quick tail thrash that sweeps them away in another loop. One minute you’re finally lifting your light-tackle wand out of the water, the next you’re left with it buried almost to the foregrip in the ocean beside you!
Over and over the process continues to repeat, though each loop gets tighter; next pass – I’ll get it on the next pass. All the while you’re left wondering what state the hooks are in: Are they fatiguing? How big is the hole in the fish’s mouth – better not slack-line the fish! The excitement and agony go on. This is a totally different kind of tussle in comparison to skirmishing with moochers dragging you through the kelp or having an outright ‘knock-‘em down’ battle with a monster kingfish.
Here's a guide to setting up for chasing skipjack and albacore tuna from kayaks.
Balanced systems
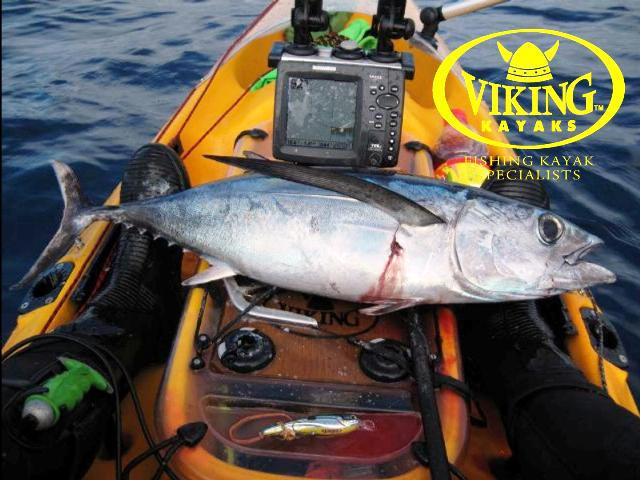
catching tuna from a kayakChasing tuna with light tackle has always been about using ‘balanced’ gear: rods, reels, lines and lures need to match each other to get the best results. Yes, this has almost become a trite saying, but to have consistent results from kayaks, the concept really is critical.
The main issue for kayak anglers is that we are limited in the speed we can paddle at. This affects how far we can travel, our ability to chase down fast-moving schools of fish, and the kinds of lures that will generate the best results. That’s not to say we’re handicapped out there; kayak fishing tuna can be very productive, but we do need to stack as many factors as possible in our favour.
I’ve found the key to success is to concentrate on ensuring absolutely every strike possible sticks and that they stay stuck all the way to the gaff. We’re investing so much time and effort being out there, it can be the height of frustration to have lures hit without hooking up – or, even worse, hooking up but then dropping fish before they can be landed. Of course running the right lures in the correct manner is also essential, but all too often I hear of kayak anglers connecting with and then losing multiple fish in a session. Using balanced systems helps minimize this.
Rods
catching tuna from a kayakFor convenience I’m going to begin with rods, but remember this ‘balancing act’ is a package deal rather than a sequential series. It’s a bit like ‘the chicken or the egg’ scenario, as there’s no real starting point and everything must work together. Rods and reels need to match line class; different lure types will perform better with different line weights; and rod and reel choices affect how well particular lures stay stuck to fish. It sounds complicated, but in fact we’ve all heard it before in different ways – it’s just a case of bringing it together as a plan or package, rather than working from one to the next.
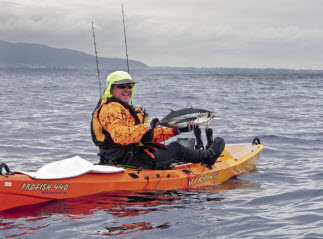
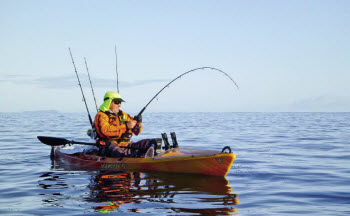
When chasing tuna from kayaks, I like rod lengths in the 1.8m–2.0m category with light tips and a medium action. Since I now use predominantly bibbed lures with trebles and 4kg–6kg braid line (depending on lure size), I find this type of rod offers a number of benefits:
• Lighter rod tips allow me to monitor a lure’s action in the water – the way the rod tip vibrates tells me whether I’ve reached the lure’s ‘sweet spot’ speed wise (with some lures it’s very easy to paddle too fast).
• Using rod vibration to monitor a lure’s action also lets me know when it has become ‘weeded’ (there’s little more frustrating than winding in after a lot of paddling and finding a good piece of kelp snagged on your lure!)
• Light-weight rod tips on a medium-actioned rod allow everything from small shallow runners through to medium sized deeper divers to all be run effectively off the one rod.
• Mid-length rods with a medium action are very good at absorbing the impact from a tuna strike made on light tackle and small hooks, while still offering enough resistance for good hook-setting.
They’re also very forgiving during battles, allowing us to push the hook strength and holding ability to the limit.
This style of rod also makes it easy to avoid slack-lining a fish – a critical aspect, as these small tunas have a habit of working a bit of a hole around the hook; any slack in the line could result in a lost fish.
When landing fish, mid-length rods allow us to play the fish within tailing, netting or gaffing range without risking high-sticking, which can break the rod. Longer soft-bait type rods can be a handful in this situation, and care must be taken or an expensive trip to the tackle shop could be the result.
Reels
catching tuna from a kayakAs mentioned, these need to be matched to the rod, the line class, and the size and type of lure being used. I happily fish for tuna with both fixed and freespool outfits, but there are a few critical factors that need to be met:
•Drags must be super smooth – aside from the risk of popping the line or breaking a light-gauge hook, a jerky drag can cause the creation of a hole around the hook in the fish’s jaw. This greatly increases the risk of losing the tuna during a heavy head shake or should any slack line get in the system.
• I like to use ‘bigger’ drags (those rated to relatively high drag pressures) and only tighten them lightly. This allows the drag to easily cope with the initial hard and fast runs, as well as the doggedness later in the battle, without becoming jerky. Smaller drags under more pressure have a habit of getting jerky when used on relatively wet kayaks, especially after multiple fish.
• I like low-inertia spools and drags. These are light in weight and spin very freely. This allows them to accelerate rapidly upon tuna striking and running, as well as handle any rapidly changing direction during the battle.
• I also like reels with fast line recovery. Typically we’re fishing lighter line classes, so high torque isn’t essential, but rapidly recovering line definitely is if a fish runs towards you! It also makes clearing lines faster and more efficient if running multiple lures.
Lines
I’ve now converted exclusively to fishing braid lines for albacore and skipjack tuna. Firstly, I find the reduced water resistance of the super-fine lines allows bibbed lures to swim better. Secondly, it allows me to ‘see’ how well a lure is swimming, because the lack of stretch is better at passing swimming vibrations up the line to the rod tip. By watching these vibrations I can adjust my paddling speeds until the lure’s ‘sweet spot’ is found.
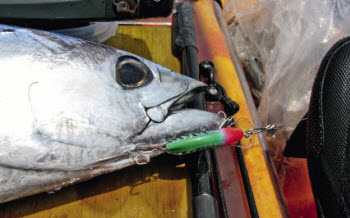
Since braid lines are highly visible, I like to run around 6-7m of light 4kg or 6kg fluorocarbon as a leader (I prefer my leaders to have the same line class as the braid line they’re attached to). This extra length also gives just enough stretch to help protect knots from popping when lures are struck hard by fast-swimming fish. For bite protection and handling fish at the kayak, I run a 500mm length of 10-15kg fluorocarbon as a trace – provided this doesn’t affect the action of the lure.
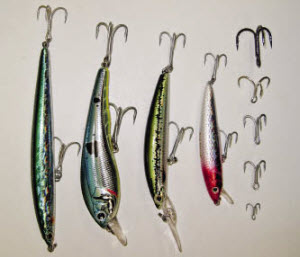
Lures
catching tuna from a kayakLure choice is an interesting topic. Historically I had always run saltwater flies, small tuna feathers, and soft-baits (yes, these can be effective as trolled lures), but in recent years I’ve progressively changed to bibbed and other hard-body lures. Throughout this process my success rate has climbed dramatically, and I put it down to a single factor: certain bibbed and hard-body lures can operate effectively at much slower trolling speeds than other lure types.
Historically, this has always been the kayaker’s handicap when trolling for saltwater species – we simply couldn’t paddle fast enough for long enough to keep ‘traditional’ lure types running effectively. Swapping to bibbed lures changes the emphasis from whipping a feathered flash through the water at speed to generate a strike, to relying on the lure’s swimming action to do the work for you. The key is to choose the right lures for the speeds we comfortably cruise at, enabling us to troll all day, considerably increasing our chance of finding fish.
The real message here is to ignore all the lure promotions aimed at boaties; there are some deadly saltwater lures out there, but we can’t maintain quick paddling speeds for long enough to make them effective. When choosing kayak lures, I head straight for the freshwater selection (just as I do when choosing ultra-deep divers to troll for snapper). These lures are designed for slower trolling speeds that are easier to maintain.
A final note: most of these lures come with light gauge hooks. If they’re saltwater rated, I suggest starting with them until you know how the lure is supposed to run in the water; simply moderate your drag settings and be prepared to fight the fish a little longer to land them. For those lures with bronzed hooks, swap them for saltwater hooks of the same size and weight. However, the key point here is to learn how the lure should run before experimenting with upgrades that may alter its action and fishy attractiveness.
Topics
Latest Posts
Archive Posts
Find Us Also On ...


