
Presenting Baits
4:37PM 29th Sep 13
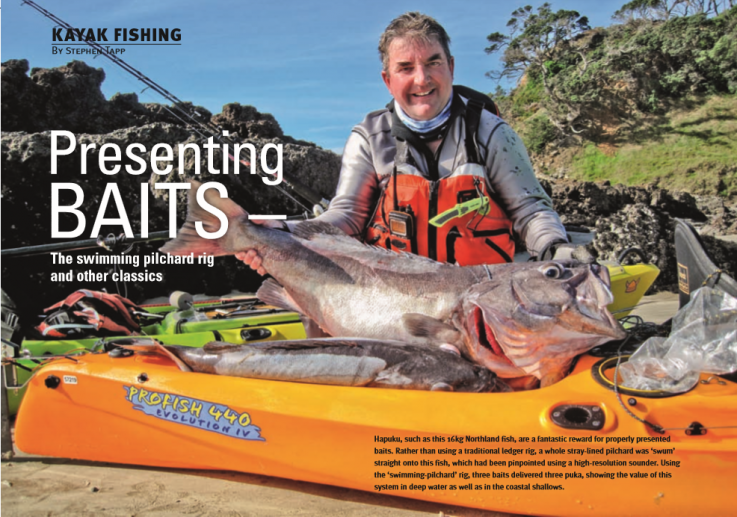
Hapuku, such as this 16kg Northland fish, are a fantastic reward for properly presented baits. Rather than using a traditional ledger rig, a whole stray-lined pilchard was ‘swum’ straight onto this fish, which had been pinpointed using a high-resolution sounder. Using the ‘swimming-pilchard’ rig, three baits delivered three puka, showing the value of this system in deep water as well as in the coastal shallows.
Presenting BAITS –The swimming pilchard rig and other classics
Let’s take a look at the terminal rigs I’m using. As with every aspect of our sport, there’s more than one way to hook your fish, but here we’re considering what I refer to as my ‘classic rigs’ and how they’re used. I’ve refined them a little over the years, but the concept and how they work remains the same, even 20 years down the track.
For me the key point has always been to consider bait presentation above all else when rigging up; it’s all about getting fish to bite. This approach has had a huge influence on the rigs I choose to use; unless you’re cubing, the bait needs to look as natural and alive as possible. In fact, over the years I’ve gained my best successes by thinking of my dead and cut baits as lures rather than simply some hunk of flesh relying on flavor appeal to entice a strike.
To an extent, even when cubing this attitude holds. By laying a cube trail, we lock species such as snapper and big trevally into a specific food source, then send them loaded baits presented so they look like the others. Best results are achieved if the cubes containing hooks look and drift ‘naturally’ to mimic the other chunks in the trail – in other words, presentation is still a key factor.
If you get the presentation right, it’s often amazing what you’ll catch and how fast and hard the fish strike. A prime example is my taking out the kingfish section of the Taranaki Kayak Classic the last two years running using stray-lined whole pilchards – hardly a standard kingfish technique, but one that delivers me several hoodlums every year. If you get the presentation right, it can be relatively easy to fool even these dead-bait wary fish with a humble pilchard.
.jpg)
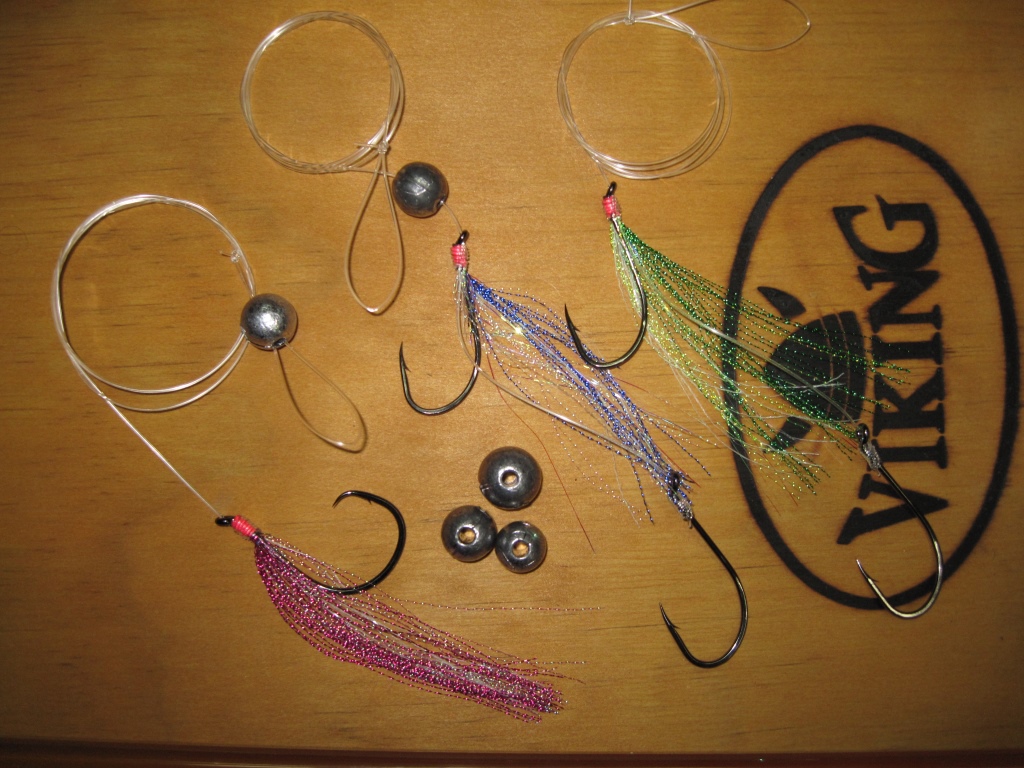
These are the two rigs that do the most damage. Both present baits in a natural forward- swimming manner, and have flasher material that streams and shimmers around the head and gills to help mimic a stressed baitfish. The single circle hook rig is an exceptional performer when using fixed-spool reels with a little slack line in the water.
A rig for all occasions
This first rig is my absolute favorite, and if I was allowed only one way to catch fish, this would be it. I find it easily the most versatile across a broad range of fishing situations, and it has reliably ‘brought home the bacon’ for me ever since I started salt water kayak fishing. I can cast it in harbor shallows and amongst mangroves, work it through the kelp and gutters along the coast, and stray-line to inshore and offshore fish. It can be twitched gently like a soft-bait to create movement and action, or weighted enough to make it ‘swim’ towards the bottom like a wounded baitfish trying to find shelter.
I simply refer to it as the ‘swimming pillie rig’, and it’s nothing more than two fixed suicide hooks on a short trace with a couple of enhancements. It’s these enhancements and the way the baits are rigged that make the difference. The concept is to have the bottom hook in the middle of the bait and the top hook at the ‘head end’, ensuring the bait moves through the water more naturally (swimming forward rather than backwards).
‘with this rig the pilchard can be twitched gently like a soft bait to create movement and action resulting in some successul hunter gathering.’
It’s been very interesting using later- generation, high-resolution sounders to watch the reactions of snapper when stray-lining below the kayak. Rigging pillies to swim in the manner described above generally results in the bait being snaffled long before it makes it to the bottom. Rigging the pillie the other way round, with a half hitch around the tail, will regularly see the snapper race in to check it out, but then follow it down without striking until it’s come to rest on the bottom. Alternating drifts using the two presentations have shown repeatable results so many times it can’t be simple coincidence.
A rigging enhancement that has become standard on all my stray-line rigs involves a length of flasher material trailing from the top hook. Again, this has come about because of a measurable difference in performance shown by running different rigs side by side over several seasons. My theory is this material streaming down the front hook and around the head of the bait creates movement and shimmer that possibly mimics a bait fish in distress that’s ‘gulping’ and trying to escape. Another feature of these rigs is being able to rapidly adjust the amount of weight/sink rate by quickly swapping the ball sinkers that slide down the trace onto the nose of the bait.
This allows me to quickly fish wildly different areas and depths as I move around the coast, and change the presentation of the bait. To achieve this I use ball sinkers with large line holes (you may have to hunt around for these, but they’re available from many tackle shops) and a loop at the top of the trace for connecting to the main- line’s clip swivel – unclipping the loop allows sinkers to slide on and off as required.
Below: using sinkers with larger holes makes it easy to unclip the trace and change the weight to adjust the sink rate. This is often critical to presenting the baits for best results.
The circle hook successor
The swimming pillie rig above is brilliant across a broad range of situations, but works best if you maintain contact with it. This allows you to feel bites and strike quickly to drive the hooks home. There are times, especially during winter fishing in brilliantly clear water, when ‘feeling’ what’s going on with the bait at the end of your line has a detrimental effect on presentation. At these times it’s desirable to totally slack-line the bait to create an even more natural look. In this application the usual suicide/ beak (or ‘J’ style) hooks aren’t the best choice, and I change to a single circle hook rig.
This has the same flasher material streaming from it as the swimming pillie rig (for the same reasons), and it’s baited simply by passing the hook once through the bait’s head. Using this rig, the bait can be cast unweighted into shallow water and allowed to drift with just enough line recovered to stop it drifting into the top layers of kelp. This is my favorite technique for fishing the white water wash zones for moochers hiding unseen under the bubbles.
Likewise, in deeper water the bait can be allowed to drift without any line pressure at all, and just enough added weight to get the desired sink rate. When the drifting baits are inhaled and the fish runs, it’s simply a matter of closing the bail (or flicking the reel into gear) and letting the tension come on without striking. This lets the circle hook do its thing and set in the corner of the fish’s jaw.
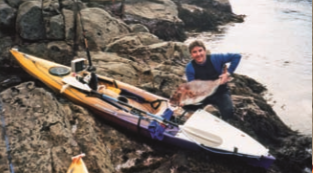
A photo out of the archives (and pre-dating digital cameras on my kayaks): this dark kelpy succumbed to a well presented bait amongst the kelp. Part of the secret is being able to rapidly adjust sink rate by changing sinkers to keep baits from fouling in the kelp.
Notes on hook selection
Hook selection is always going to be an area of personal choice, and the well-respected brands have all gained that respect for very good reason: they’re top quality and work well. That said, there are a few characteristics I look for when selecting hooks for the way I fish:
- Sharp points and fine gauge: since we’re fishing from kayaks, it can sometimes be difficult to strike hard enough to properly set the hooks. In part this comes from operating from a seated position in a tight cockpit, and in part from the fact that the kayak will pull towards the fish, reducing your ability to drive the hooks home. Wickedly sharp points start the process and a fine gauge wire makes it easier for the hook to penetrate.
- Strong offset: I find this allows the hook to twist clear of the bait more easily on the strike and reliably drive home. Once engaged in the fish’s jaw, I have fewer problems with dropping my catch if it gets slack-lined while repositioning the kayak (a critical consideration when operating around a surging reef break or rugged coast).
- Good nickel coating: as I pre-tie all my rigs, I don’t want any corrosion issues. It’s extremely frustrating and expensive having to bin rigs because points have disappeared and shanks been weakened as a result of the dreaded ‘orange fungus’.
Trace material
I vary my trace material depending on the target species and areas being fished. In most cases I prefer to use a very supple material, making top quality co-polymer lines the best choice. These are easy to work with, tie great knots, and have enough suppleness to limit their influence over the way baits drift and ‘swim’. When targeting non-toothy species – ranging from kahawai and john dory to large trevally – in less than perfectly clear water, I’ll use 18-24kg trace.
For targeting snapper and smaller kings I normally move up to 37kg, and for larger kings I may go for 45kg, but material this thick will definitely have an influence over the way dead and cut baits are presented. If the water is very clear and I’m targeting sight-orientated species such as trevally and kings, I’ll change to fluorocarbon trace.
.JPG)
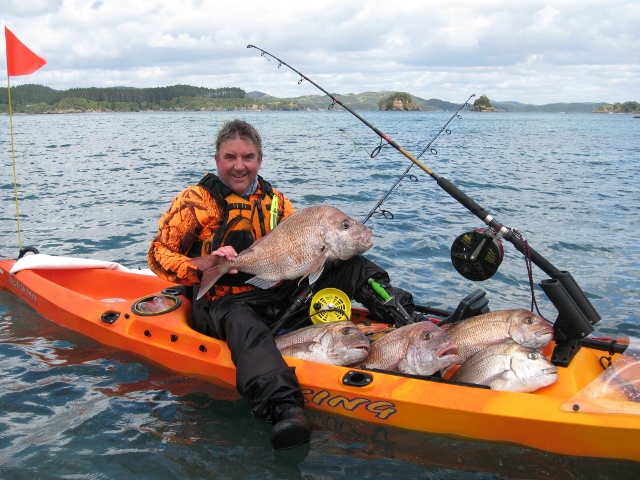
A nice feed of snapper, all caught on the rigs mentioned here. Not only is this rig succesful with snapper but with Hapuku, Kingfish, Trevally, Kahawai..it has universal appeal / effect
This material is harder and more abrasion resistant, but typically much stiffer than the comparatively supple co-polymer material. This makes it essential to drop down in weight/diameter, but the harder nature of the line allows it to cope with teeth and rocks very well. For spooky trevally in clear water
I’ll drop to 10 or 15kg fluorocarbon and accept that I may have the odd snapper bite me off. When targeting line-shy kings on light tackle in very clear conditions, I’ll rig up using 24kg fluorocarbon. Other than being reefed, I’ve never lost a kingfish on this combination of light line-class and fine diameter fluorocarbon trace; it’s quite capable of standing up to the abrasion dished out by kingfish ‘raspers’, provided you don’t try and trace the fish!
Topics
Latest Posts
Archive Posts
Find Us Also On ...


